Friday, January 15, 2010

Model Railroad: Track Weathering and Fascia Board


Well, I've made a little more progress since Christmas. I received an inexpensive airbrush as a gift, so I decided the first project I should tackle is weathering the track. I followed the technique spelled out by Lance Mindhiem in the Model Railroad Magazine special track edition. I started off with a light spray over everytning with Polyscale light gray thinned way down with isopropyl alcohol. After this dried I went back over the ties with a very dilute wash of artis oils burnt umber thinned with mineral spirits. This went on a lot easier than I feared, and actually looked pretty darn good when I finished. It really brings out the detail in the Micro Engineering track and turnouts. I finished things up by using a Floquil weathering paint pen, rust color, and drew along the visible side of each rail. The little bit that spilled down onto the tie just looks like the tie plates. Again, this went very quickly and looks pretty good. After a bad experience trying to clean the railhead with a paper towel soaked in alcohol, I followed some advice I had run across somewhere and soaked a couple small scraps of pine in alcohol and used that to clean the rail head. It worked great and didn't bother the paint on the side of the rail. Next step will be to try my hand at laying ballast!


The other minor thing I did was to rip some 1/8" masonite down to 6" and make a fascia to go around the perimiter of the layout. 1/4" would have been better (stiffer), but this is what I had lying around, and it will work fine for something this small. Not sure if I will paint it eventually or not, but even in the natural dark brown color it really improves the looks of things by hiding the edge of the foam and the wood.


Tuesday, December 22, 2009

Model Railroad: Starting the Building Mock-ups

Well, my son's football season is over, so I've got some time to start working on the railroad again. I decided the next step was to start building up some more elaborate mockup buildings to get a better sense of the dimensions, style, overall look, etc. To make the mockups, I started browsing around my faviorite (FREE) texture website, [url]http://www.cgtextures.com/[/url] and downloaded a bunch of images of rollup doors, concrete, plaster walls, etc. I also did some sightseeing in Miami via Google Street View and grabbed a few screen shots of signs, container stacks, etc. I took some measurements of the building footprints and started putting it all together in Microsoft Visio with the drawing scale set to 1ft = 87ft. A little cropping and resizing, and it comes together pretty easily. Printed the results out on a color printer on plain old cheap paper, used spray adhesive to stick it to 3/16" foam board, cut out all the pieces with a razor blade, and assembled everything using Elmers white glue. They're certainly not permanent structures by any stretch, but I think they look pretty darn good for the little bit of work it took.


Sunday, August 23, 2009

Model Railroad: Trackwork Done (well almost)

I was able to get the last of the track laid on the shelves. The only track remaining is in the mini staging yard, but that has to wait for a trip to Hobby Lobby for a code 83 #4 RH turnout.

The first photo shows the final track arrangement on the north shelf. On the right side of the photo I decided to put a jog in the track and model it as though a turnout had been removed. Where the aluminum yardsick is lying will be modeled as abandoned track - maybe just old ties to make it look like a siding used to be there. The track on the far right will be some sort of team track - maybe buried in pavement, or just gravel - time will tell. In the corner closest to the camera will be sone sort of warehouse.


The second photo shows the start of the canal on the south shelf. I plan to put a piece of 1" foam in the bottom to give me something flat to start with. The final depth below grade of the canal should be around 1".


The third photo shows the final track arrangement in the south east corner.


Model Railroad: Progress Photos

After pondering alternatives for the backdrop on the new north wall section, I decided to go ahead and extend the existing 1/8" masonite backdrop and just cut out a hole for the thermostat that's there. The backdrop is only 14" high - I might end up wishing it was taller before I'm all done, but at this point it was easier to extend what I already had there. I can always make it taller later if I really want to, but I think this will work out OK.


I also managed to get all ten turnouts laid along with most of the track. I decided to solder all of the rail joiners. I've seen posts extolling the virtues of soldering and of not soldering, so I decided to play it safe and solder. I figure that being in a basement the temperature won't vary that much and the dehumidifier will keep the humidity level relatively stable. Also, since the longest dimension is only 9 feet, I can't imagine that there will be enough expansion or contraction to cause any problems.


This is the opening in the northwest corner that goes to the small staging tracks.


Looking towards the northwest corner.


The canal area.


For track feeders, I am using a heavier gauge doorbell wire (20 gauge solid I believe). I solder these to the bottom of the rail joiners roughly every 3 feet or so. They feed through to the underside of the shelf and then are soldered to the 14 gauge solid bus wires that run under the table.

For now I have my cheapie MRC power pack soldered to the bus wires just to be able to run my sole engine back and forth.


This is looking at the bottom of the layout. The bus wires are regular old 14 gauge solid (stripped from romex). The smaller feeder wires are soldered to the bus wires and feed up through the plywood and foam to the tracks above.


The warehouse mockups are currently nothing more than 1/4" styrofoam and miscellaneous boxes. I am planning to build these warehouse buildings primarily out of styrene plastic. I'm going to have to do some research to see where I can get the detail parts. Again, I'll rely heavily on descriptions by other modelers on internet sites to see how they did this. I imagine things like roll-up doors could be made out of some sort of currugated styrene stock.

Thinking about it, I imagine that my order of proceeding from here would go something like this -
1. Complete laying track and installing feeder wires.
2. Verify flawless operation of the track by running strings of cars at high and low speed through the various combinations of turnouts. Iron out any problems before doing anything else.
3. Complete any additional backdrop painting - probably just another coat of blue, I don't think I'm going to fool around with painting clouds or what-not.
4. Paint the track a uniform color. Thinking some sort of gray-ish wash for the ties and some rusty-ish color for the rails.
5. Establish the exact dimensions for the various buildings and build correctly sized mockups as place holders. The mock-ups I have in place now are very rough and the dimensions were pretty arbitrary.
6. Decide on the exact location of the canal and carve away the appropriate amount of foam.
7. Install ballast on the track
8. Start work on ground scenery, trees, shrubbery, etc.
9. Start building the "real" warehouse buildings to replace the mockups.
Another thing I need to be thinking about is some sort of rudimentary video system so that i can see what is happening on the staging tracks.

Lots of fun little projects.


Saturday, August 15, 2009

Model Railroad - The Tracklpan

Here is what the trackplan finally ended up looking like. Hopefully there won't be too many changes....
.

Model Railroad - Transferring the Trackplan to the Benchwork

A day later (August 4), the paint was dry enough, so I moved the full scale trackplan plan to the benchwork. Getting everything to line up correctly is a bit of a challenge because the walls are not exactly perpendicular and I need to make sure the track passes through the east wall at the drywall and not at the concrete basement wall.


To transfer the track centerlines to the foam I pin the plan down with push pins every 8-10" so it doesn't shift around, and then I go along with a sharpie marker and push right through the paper into the foam along the track centerline every couple of inches. Where there is a turnout I put a series of three marks at each of the three legs of the turnout to give me a better chance of getting it lined up correctly.


Friday, August 14, 2009

Model Railroad - benchwork up and ready

As of August 3rd I had gotten the last of the benchwork (shelf work?) erected and the foam board glued down. The bench work on the East and south wall were once the home of an aborted attempt at an 'N' scale layout, so the foam was pretty marked up. I decided to give the whole works a coat of some tan latex paint I had laying around. I figured this would give me a clean slate so that when I started marking track centers I wouldn't get confused with the old markings. I also thought that tan would look much better in the short term than pink and it might help me later on when I start ballasting track to already have it painted under the ties.

This first photo is looking towards the southeast corner of the layout. This short section is where the canal is going to go.


At the time I was not quite sure what I want to do about a backdrop on the new north shelf. I could put up a piece of 1/8" masonite like the east wall, but then I would have to work around a thermostat at the far west end of the shelf. The alternative would be to just paint the appropriate section of the drywall the same blue color and let it go at that. The thermostat is a line level style (240v) and I really don't feel like going to the bother of relocating it.


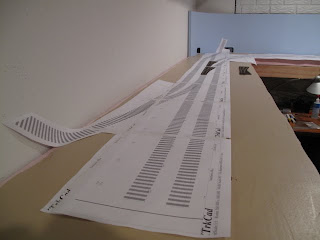
While the paint is drying on the benchwork, I decided to start laying out the track using the 1:1 print feature of XTrkCad planning software. This software is just fantastic, as is the price (Free!). A roll-fed chart printer would have been nice - but I had to suffice with printing the layout on 48 sheets of good old 8 1/2x11 paper. I decided to assemble (tape together) the track template on the pool table since the layout bench was still wet. This actually worked out better because of the larger space to work with and the lower height. Once the paint on the foam dries, I'll start transferring the track centers to the foam.In the photos, the thinner section to the right is the north shelf and the wider section is the east shelf.